Why Knowing the Process Matters Before You Book
So you’ve got a panoramic sunroof and you’re thinking about getting it tinted. Smart move. But here’s the thing — you’re probably wondering what actually happens during installation. And that’s totally fair.
Most people have no idea what goes on behind the scenes. They drop off their car, wait around for a few hours, and pick it up hoping everything went okay. But understanding the process? That puts you in control. You’ll know what questions to ask, what to look for, and whether the shop knows what they’re doing.
If you’re searching for Panoramic Sunroof Tinting in Lompoc CA, you’ll want to find installers who actually specialize in panoramic glass. It’s not the same as slapping film on a flat side window. Not even close.
Let’s walk through what really happens from start to finish.
The Pre-Installation Prep Work
Before any film touches your glass, there’s prep work. And honestly, this part makes or breaks the whole job.
Cleaning That Goes Beyond Surface Level
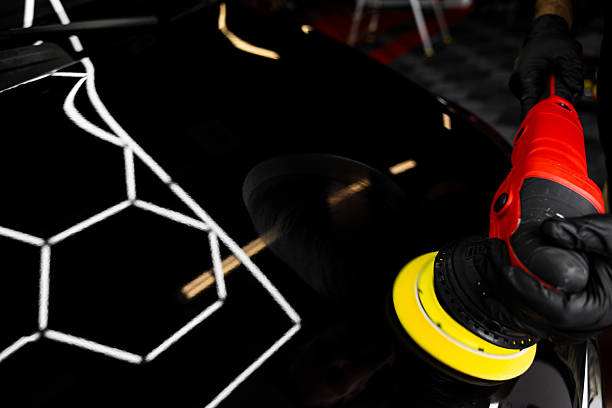
First up — cleaning. But not regular cleaning. We’re talking about removing every spec of dust, dirt, and residue from both sides of the glass. Any tiny particle left behind creates bubbles or imperfections that show up later.
Professional installers use specialized solutions that won’t leave streaks or chemical residue. They’ll clean the glass multiple times before moving forward. Sounds excessive? It’s not. Panoramic sunroofs are huge, and there’s a lot of surface area where things can go wrong.
Inspecting the Glass Condition
Good shops also inspect the glass itself. They’re looking for:
- Existing chips or cracks that could spread
- Previous tint residue if you’ve had film before
- Manufacturer coatings that might affect adhesion
- Any defects that need documentation before work begins
This protects both you and the installer. Nobody wants a disagreement about whether that scratch was there before or after installation.
How Installers Handle Panoramic Glass Curves
Here’s where things get interesting. Panoramic sunroofs aren’t flat. They curve — sometimes dramatically — and that creates real challenges.
The Heat Shrinking Technique
Unlike flat windows where film can basically be cut and applied, curved panoramic glass requires heat shrinking. Installers use heat guns to carefully mold the film to match the exact curvature of your sunroof.
This takes skill. Too much heat damages the film. Too little leaves wrinkles that won’t ever lay flat. The window film technology has improved over the years, but the application technique still requires hands-on expertise.
When you’re looking for Panoramic Sunroof Tint in Lompoc CA, ask potential installers about their heat shrinking experience specifically on large panoramic panels. Their answer tells you a lot about their actual skill level.
Single Piece vs Multiple Pieces
Some installers use one continuous piece of film for the entire sunroof. Others might use multiple pieces with seams. Both approaches have pros and cons.
Single piece installation looks cleaner but requires more expertise. Multiple pieces are easier to manage but can show visible seam lines over time. Most quality shops prefer single piece application for panoramic sunroofs when possible.
What Actually Happens During Installation
Alright, let’s break down the actual installation step by step.
Step 1: Final Surface Prep
Even after initial cleaning, installers do one more wipe down right before application. They’re working against the clock here — dust settles fast, and even fingerprints can cause problems.
Step 2: Film Positioning
The pre-cut and heat-shrunk film gets carefully positioned on the exterior of the glass first. This lets installers check the fit and make any final adjustments before committing.
Step 3: Application Solution Spray
A special application solution gets sprayed on the glass. This creates a thin liquid layer that allows the film to slide into perfect position. It’s not just water — it’s a formulated mixture that evaporates cleanly.
Step 4: Film Application and Squeegee Work
The film goes on and then comes the squeegee work. Installers push out air bubbles and excess solution, working from center to edges. This part takes patience. Rush it and you get bubbles. Professionals like Coastal Tint understand that proper squeegee technique separates amateur jobs from professional results.
Step 5: Edge Trimming and Finishing
Final edges get trimmed to exact fit. The film needs to reach close to the edges without overlapping onto seals or trim pieces. Precision matters here.
Time Requirements: How Long Does It Really Take?
Panoramic sunroof installation isn’t a quick lunch break job. Expect anywhere from 2 to 4 hours depending on several factors:
- Size and complexity of your specific sunroof
- Type of film being installed
- Whether old tint needs removal first
- Shop workflow and staffing
And here’s something lots of people miss — the curing period. Your tint isn’t fully set when you drive away. It needs 3 to 5 days to fully cure, sometimes longer in cooler weather.
What You Should Do Before Your Appointment
Show up prepared and the whole process goes smoother.
Clean out your car interior, especially the rear seats and cargo area. Installers need access and don’t want to work around your stuff. If you’ve got a Panoramic Sunroof Tint in Lompoc CA appointment scheduled, make sure the interior is cleared beforehand.
Also, check your sunroof operation. Open it, close it, tilt it. Make sure everything works properly before installation. Any mechanical issues should get addressed first.
Post-Installation Care for the First 72 Hours
The way you treat your new tint in the first few days affects how it looks for years. Here’s what matters:
- Don’t touch the interior surface of the tinted glass
- Keep windows closed for at least 48 hours
- Small water bubbles are normal and disappear as film cures
- Avoid using defrosters at high settings initially
- No cleaning products on new tint for at least one week
Patience during curing prevents problems down the road. That hazy appearance? It clears up. Those tiny bubbles? They go away. Just give it time.
Why Panoramic Installation Differs From Regular Windows
Regular side windows are relatively straightforward. Panoramic sunroofs? Different ballgame entirely.
The size alone creates challenges. More surface area means more opportunity for contamination, more complex heat shrinking, and more skill required for bubble-free application. Plus, panoramic glass sits at angles that make gravity work against installers.
Experienced shops charge more for panoramic sunroof work because it genuinely takes more time and expertise. If someone quotes you the same price as side windows, that’s a red flag worth investigating.
For additional information about finding qualified installers in your area, local business directories can point you toward shops with verified experience.
Frequently Asked Questions
Can I drive my car immediately after panoramic sunroof tint installation?
Yes, you can drive right away. Just keep the sunroof closed and avoid touching the tinted surface. The film is applied but not fully cured yet, so gentle treatment matters for the first few days.
How do I know if my installer did a good job?
Look for clean edges with no visible gaps or overlaps. Check for air bubbles after the curing period — small ones during the first week are normal, but large bubbles or ones that persist indicate problems. The tint should look uniform without hazy patches.
Will panoramic sunroof tint affect my car’s warranty?
Typically no. Aftermarket tint on glass doesn’t void manufacturer warranties on mechanical or electrical components. However, if tint installation somehow damages the sunroof motor or seals, that specific damage wouldn’t be covered. Quality installation eliminates this concern.
How long does panoramic sunroof tint actually last?
Quality ceramic or nano-ceramic films last 10 to 15 years or more. Cheaper dyed films might fade or turn purple within 3 to 5 years. The film quality and installation expertise both affect longevity significantly.
Can bubbles appear weeks after installation?
Bubbles appearing weeks later usually indicate contamination during installation or adhesive failure. This shouldn’t happen with professional work and quality film. Most reputable shops warranty their work against bubbling, peeling, and discoloration.
Now that you understand what goes into proper Panoramic Sunroof Tinting in Lompoc CA, you’re equipped to ask the right questions and recognize quality work. Finding an installer who takes time to do things right makes all the difference in how your tint looks and performs for years to come.